There will be dust

Well, we've finally made it - We moved into the new house on Friday. And, even though after every move I swear that we'll hire movers next time (David always pretends to hear me and then changes the subject) we found ourselves at Budget picking up a 16ft cube van at 7am on Friday morning. By 5pm we were done and completely knackered. Everything made it in one trip too; not too shabby if I do say so myself, though lugging a pair of steel horizontal file cabinets with David practically killed me.

The weekend was spent organizing, cleaning and priming as much of the drywall as we could (there's still lots to go). Getting rid of drywall dust is the main objective over this week, and so far the top floor is completely primed, semi-organized and mostly dust free. Two more floors to go... It isn't all fun and games though - The old thermostat can't seem to get the heat over 17C (we're waiting to change it out once all the dust is done with), so it's a wee bit chilly, and we've got no sinks or counters in the master bathroom or the kitchen, which means dishes get done in the basement bathroom. Thankfully our contactors will be hooking us up with a temporary sink in the kitchen over the next couple of days, and Home Depot will be popping by to template the Corian counters and sinks this week (yay!).

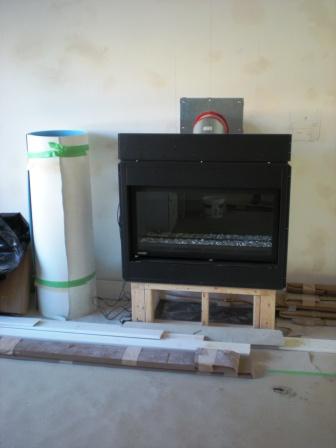
Through all this we have made a final decision on the fireplace surround, since we've managed to score some edgestone tiles that have a nice mid-century vibe. One teensy problem-o though; the stone colour reminds me of cat sick, so, much to the consternation of our contractors, we'll be slapping white paint on the tiles once they're done. Take a boo below at an inspiration shot of the tiles - if you can, squint to imagine them white - and a shot of the style of Montigo fireplace that Odyssey Fireplace installed on the main floor.


Saved by Saralisa and Sagan

I've been driving myself bananas looking at options for shower curtains, hooks, towel rails and toilet roll holders for the basement bathroom (have a look here). I'd hit every fancy bath supply store I could think of (ummm, no, I won't spend $80+ on a toilet roll holder) and stopped in at every big box imaginable and, seriously, there was bupkis worth lugging home. So luckily yesterday, on a run through Ikea scouting for a makeover I'm working on for CityLine, inspiration struck.

I turned a corner and there was Saralisa; a new line of fabric that just landed the shelves that has the chops to make an absolutely boffo shower curtain. Not sure whether I'll be plunking for the white or the black, but y'know, at a chintzy $6.99 a yard maybe I'll make 2! The other big save was Sagan for all the hook, rail and toilet roll holder business. Hefty and modern in a bright chrome finish - Just what I'd been searching for, and that swish little roll holder is a very budget friendly $14.99...


And in this corner...

It's been a big week for the house project and I have to say, after popping in there today, that it really does look like we'll get in there by Feb 1st.

On the kitchen front, Home Depot's Installation Services have done a bang-up job on the initial install on the Venicia cabinetry in prep for the appliances that arrive next Tuesday (yay Jenn-Air!). Once the appliances are in, the countertop will be templated (we're going with a Corian surface and an integral sink). And then, when the counter arrives (in around a week to 10 days), we'll be able to finish by tiling the backsplash.

One thing we had our fingers crossed for was a fireplace for the main floor and yep, we managed to squeeze it into the budget. It's a swish letterbox style direct vent gas unit by Montigo (the flue goes straight out the exterior wall) that we sourced through Odyssey Fireplaces, who installed it nice and swiftly a couple of days back. Cera Stone, our great contractors, will be framing and finishing the surround this week. Take a boo at how it looks right now, and how it might look once finished, though we're currently kind of taken with the fireplace surround in that Marimekko shot in the post below...

And finally, under all that protective paper, is our delish new bamboo floor that we scored at Home Depot - Quality Craft carbonized bamboo in a Gunstock stain (it's the middle tone in the sample board below). While I was researching flooring choices the whole sustainable side of bamboo made so much sense - Bamboo can be harvested in 3 years, while oak needs 125 years to reach maturity.

To check up on the reno, and to see what's happened so far, click here.


Almost, but not quite

The neighbours must be loving us - All this snow and ice has meant the filled-to-the-brim skip out front of the house can't be picked up yet (fingers crossed for a slight melt soon), and now it's a wee bit more full with packaging from the kitchen install. Yup, the kitchen is going in (can I hear a woot-woot?); the Home Depot installers arrived yesterday and the work has begun on fitting all the de-lovely Venicia by Kraftmaid cabinets.

We went for the Mirra Collection Carina doors in Bianco Gloss (take a boo below at a Venicia kitchen in the Chianti Gloss, and squint to see it in white and not red, lol). They're chic and simple flat panel doors with a swish integral aluminum pull for a seamless and ultra-modern look. The planning process at the store was great; we worked with Georgina (she's a treasure!) who knows the Venicia matrix upside-down, totally maxing out on all our storage needs. Make sure to click here and read up about all the Venicia cabinet's bells and whistles.

Picking out appliances was, as usual, eye-wateringly difficult since there is so much fab gear to choose from. I firmly believe that once you pick the range/cooktop everything else will fall into place and, since our range will sit smack dab in a peninsula, we decided to go with one that had a downdraft extractor so we didn't have to worry about a ceiling-mount rangehood. Tada! Jenn-Air had the perfect solution, we went with their Dual Fuel Slide-In Downdraft Range, which led us to pick their Cabinet Depth Side-by-Side Refrigerator and the Energy Star rated Built-in Dishwasher - All in stainless steel with a great modern industrial vibe.

For the countertop and integral sink we're set on Corian (though I'm flip-flopping on the colour), the faucet is the fantabulous new Karbon articulated kitchen faucet from Kohler, and the backsplash a ribbed white glass subway tile from Daltile called Taffeta - All available to order through Home Depot.

Click here to see the story so far on what's been happening on our mondo reno - We're finally in the home stretch, with a move-in date of Feb 1st!


Are you sitting down?

Never a good way to start a conversation, especially when it's either coming from a doctor or a contractor - You just know it's not going to be good news. Yesterday, while I was at Elte sourcing a gorgeous carpet for a project, that sentence popped up in a call from our contractor. Oy. I told him to go ahead, since if I fell it would be onto a plush pile of rugs.

Here's the deal: On our roof we have a homemade skylight which we wanted removed (it's way ugly and in an odd spot in our teensy back bedroom) so the guys went up to take a peek. Ummm, not only does the skylight have to go, but the whole roof has to be replaced. Yep, a new roof. Apparently there is just a single layer of tar paper up there, and the wooden substrate is also on it's way to rotting out too. So there's no choice, a large wedge of our budget will now be used to fix the roof, and pretty sharpish too; the chance of a flood or a leak after the guys have done such a stellar job on the interior would be devastating. Take a look at all the work that's happened so far on the place here.

A flat roof specialist will be popping by on Tuesday to survey the job and hopefully, with a bit of luck and a few days of good weather, it'll get done nice and soon. Merry Christmas indeed (I think I might have just lost my Holiday spirit).

Handsome, not scruffy and inefficient

I don't know whether a woot-woot or a wheeeeee is appropriate, but we're awfully excited about the new Jeld-Wen windows going in at our place. Basically, when we had the energy assessment done, the suggestion for getting new high efficiency windows was a total no-brainer - Our mix of mangy vinyl sliders (circa 1985) and original 60's aluminum windows (sometimes both in the same window, don't ask...) were just not cutting it; not in the looks department and definitely not on the saving money on the energy bill side of things.

Our great contractors, Cera-Stone, measured everything up and then we started the process of deciding on the look and finish (lawdy, I do love customization). With help from James, our rep from Jeld-Wen, we decided on a line of theirs called Donat Flamand, made just outside of Quebec City, and picked aluminum clad AuraLast wood frames with Low E glass and Argon gas between the panes (in simple terms both the glass and the gas-fill improve insulation, keep the heat down in the summer and allow for passive heating in the winter, read more here). We went dark and neutral on the cladding and picked their ALUM Brown, though they have about 30 colours to choose from, and then designed the smaller windows to split into 2 (casement and fixed), and the larger to split into 3 (casement and 2 fixed). Since we wanted everything nice and clean and simple the 3 exterior doors were ordered to match too - full glass, plus a sidelight for the dining room and front door. Phew!

Take a peek below at the progress (that's the before snap of the back of the house from the end of July, followed by where we're at today). Click here to see the story so far on the reno and, if you're in the market for new windows; here's some good info from Natural Resources Canada on what to look for.


Insert kitchen here

Make sure your wigs are securely attached; it's going to be a whirlwind of a week. I'm getting a little exhasuted thinking about it, and it's only Monday morning, but this is a crucial time on our reno. Tomorrow both the kitchen cabintery and all our new windows arrive. Phew.

The main floor has been mostly drywalled in anticipation (take a look below) and the contractors are ready to receive everything and get rocking and rolling on it all. So, a few things have to happen in quick succesion - #1 The windows have to be installed asap. #2 The new floor has to be laid down. #3 The kitchen cabinetry gets installed. Tired yet? lol

I'll go for One

Work at the house continues apace and we're making decisions left, right and centre to keep things moving in the right direction. The basement had major issues - it looked like a serial killer's hangout and had been horribly re-wired at some point by a maniac with a death wish, so anything we do is an improvement, lol.

First up is the basement bathroom, it's all sorted and ordered (yay!), so hopefully the chic and terribly water efficient American Standard Champion 4 toilet, with 6L water consumption, is winging it's way here as I type this. Along for the ride, and again from American Standard, is the mod Ravenna pedestal sink and clean-lined Serin tub. The jam on this part of the project is the sleek and handsome One series of faucets that we're going with for the tub and sink; all swish and sparkly in a polsihed chrome finish. Lovely, and the whole shebang can be ordered at Home Depot.

The space will be finished off with satin white subway tiles that will be laid stacked from floor to ceiling (take a look at the inspiration shot below) and a Marine light for above the sink (a thrifty fave of mine). Hmmm, what to do for a mirror?

Take a look here to catch up on the rest of the fun and games with the reno. 


The beams, the beams

This was a big week for the reno; the steel beams arrived, a mondo 700lb one and two smaller ones. Why? You might ask. Well, we had the madcap idea to remove all the walls on the main floor, to open the space up, and need the beams to support the upper level of the house.

Getting that main beam in was no mean feat, it took 8 guys to heft it through the front door and then winch it into place. And, since it has to be such a tight fit, they had to punch through the exterior wall to finally set it in place. Phew. It was a total step-by-step process that took time and patience - As walls were removed temporary supports were installed and will stay up until everything is complete. Thank the lawd for our on-the-ball contractors, Cera Stone. And, to catch up with the story so far on the renovation click here.


On the tiles

While we've been waiting for that steel beam to arrive for the main floor work has been happening on the master bathroom. Yay! A step or two closer to actually getting finished and moving in; I can't tell you how exciting that actually is!!! Yep, definitely a 3 exclamation mark moment.

I'd worked on the design and picked out the finishes and fixtures a while back (they're all special order from Home Depot) - 

The tiles are all Daltile; the large rectangular ones are for the main bathroom floor, while the mosaic is for the shower area. Mantova, that's the name of the swanky hi-gloss Carrera marble look tiles, will go from floor to ceiling.

Ummm, is it weird to get excited about a toilet? Oh, the joys of home ownership, lol. Kohler's Purist Hatbox toilet is the bee's knees, add in their Oblo wall-mount faucet and the WaterTile ceiling-mount shower fixture for the walk-in shower (there'll also be a Purist hand shower in there) and, well, I may never leave...  

The house project gallery - Updated

I've updated the The House Project image gallery to give more of a sense of how the renovation is progressing. Not exactly a 'before and after', more of a 'before and in-between' view of what's going on in almost every room. Click on the button above or here to catch all the shots in the gallery and, to read about our travails so far, click here. More to come, since work is moving ahead slowly but surely, but we're getting a little iffy about that January 1st move-in date!

Petite problem

While we wait on the permit to approve all the walls coming down on the main floor other work has been continuing - Framing has started on the kitchen wall (it has to be pushed out to conceal venting), and the master bath and powder room have been framed too. That powder room has been giving us major headaches, it'll be small, not quite airplane small but we definitely won't be holding a cocktail party in there anytime soon.

With size and space in mind we've had to re-jig the toilet and sink we'd originally fallen for and plunk for practical instead, though of course they're no less shabby in the looks department. Kohler's Rialto toilet has pretty much the smallest footprint on the market so was the perfect pick, and the Minette corner sink by American Standard is the most petite we could find - Yay for Home Depot! And, since we've been talking looks, I wanted to include a snap of the crazy glam wallpaper I dragged back from Paris; pretty fab no? Quite the steal too, at only 16 Euros a roll (I love BHV!!!). I'm thinking it'll cover not only the powder room walls, but perhaps even the ceiling and the door too.

Take a look below, and to catch up with the story so far on the renovation click here.

Home work

"What's up with the house?" Every Tom, Dick and Harriet have been asking, so here's the up-to-date deelio with where we're at on the reno front. Nothing too picture worthy unfortunately, though lots of behind the scenes stuff has been happening to move everything forward.

Cera Stone, our fab contractors, have had the electricians in to completely re-wire the house (we had aluminum wire which had been crazily jacked around in a previous reno), so there have been tons of decisions on lighting (where to put the pot lights), switches, outlets and phone and cable. I was hoping for an elegant solution for oullets in the master bathroom, since I'd like them hidden in cabinetry, so we'll see how we do with that. The re-wiring is almost done and is waiting on construction to start before it can be completely finished.

On the 'major' side of things we've had the architect in to draw up plans for the main floor since we want to, umm, remove all supporting walls. That means beams, baby. One huge steel one and perhaps two wood ones tied in, all concealed in the ceiling (we'll lose about a 3/4"). Once the plans are in with the City we'll be waiting on permits to get on that stuff (more picture-worthy for sure!).

So, we're pretty much on-schedule - But, will we be cracking open the Veuve on New Years in the new place?

To take a look at all the before shots on the house click here, and to check out all the story so far on the reno click here.

Laundry Love

So, I have to admit, while pulling together Style Scout for Saturday's National Post - all about the sudsy world of washers and dryers - I ended up shopping for our new laundry room. Sleek design, smarty-pants features, seductive colours and of course energy efficiency and water conservation all came in to play.

It really was love at first sight with the just launched GE Profile SmartDispense laundry pair. Their SmartDispense dishwasher had caught my eye a while back (read a TreeHugger review here) - and this new washer is just as jammy: it only needs to be topped-up with soap every 6 months. Add in Stain Inspector to take care of everything from grape juice to motor oil, and CleanSpeak, which lets the pair 'communicate' to seamlessly figure out how best to dry a load, and you have a winning combo. And finally, by switching out an old top loader for this Energy Star darling you'll save up to 14,000 gallons of water a year (that's like 3,000 showers). Need I say more?

Quality workmanship

When our new place was built in 1965 they really knew their stuff, but ever since then everything that has happened to the house has been, well, weird. Apart from the obvious (a shower off the kitchen) we've been finding lots of evidence of what I can only describe as quality workmanship. When pulling out the walls in the master bath we found Coffee Time coffee cups and bits of drywall and wood shoved into the walls - was it for insullation? Nice, but nothing compared to the delightful mess that was awaiting us in the basement.

Previous owners, the ones who had the brainwave to brick up the garage door, also did lots of other 'smart' renos in the rest of the downstairs. We had no choice, all the drywall had to come down so we can re-route services up to the second floor, but boy, did we have a suprise or three. A dropped ceiling suspended from hundreds of bits of old wood - including a chair leg - hid a spiders web of wiring so spookily bad that our contractors, Cera Stone, said it was sheer luck that no-one had been electrocuted. Then the wall came down. Behind it we found more 'insullation' in the form of garbage, part of an old fence and a few plumbing parts from a toilet. All lovely of course, but one day soon this will be quite the fab laundry room. Take a look here to catch up with the story so far on The House Project.

Bare bones

That's just about where we're at with the new house; back to bare bones. After two stellar days when Manuel, David's dad, came to lend a professional hand we've made major progress. Before Manuel's arrival we were removing the drywall by literally smashing it with the sledgehammer, errr, fun but not exactly the smartest route. Now we use the jimmie, jimmie, lever technique; which brings a whole sheet down at a time. Who knew? Though, like high school calculus, we might not ever have any real-world application for this in the future (fingers crossed).

We're onto skip number 4 (the neighbours are counting, lol) and have pretty much hit a brick wall - All the old flooring is up throughout the main and second floor, we're back to studs on all walls that we're hoping to remove and the main floor ceiling is down too. Removing the strip wood flooring is the biggest pain ever, mainly because each and every nail has to be pulled out by claw hammer and - there -are - thousands - Ugh. We've just about crawled over every inch of sub-floor on nail patrol.

Next step is for our on-the-ball contractors Cera Stone to draw the plans, permit, and then execute setting a steel beam and two wood beams that will support the second floor.

The first couple of pics show what's left of the main floor living area, and old main floor shower room. The second couple show the master bedroom with the closets knocked out and the master bathroom sans tub, toilet, and wall. And, take a look here at the work on the house so far.

Men at work

After all the ugliness with that bricked up garage door in the basement (take a look here) we had to take drastic action and a fab crew was called in to take care of it. They arrived bright and early Saturday morning with heavy equipment and set to it. The backhoe sliced through the asphalt like buttah and then made quick work of the fill (basically construction scrap and garbage) to reveal the drain and the soon to be replaced brick wall.

It's just lovely to see good work replace bad, taking us one step further to getting stuck in to the interiors. Not to be outdone, David and I kept busy by fishing out black crud from a basement drain that was slightly on the blocked side. Will the fun never end? lol 

Destruction part deux

The more ripping out we do ourselves, the better our budget will be stretched over the long term on the house.- smart words, though the reality is a fair bit dustier.

So far most of the walls on the main floor have gone, add in the walls dividing the basement, and a few up on the top floor and you can see why we've already filled two skips to the brim (there's still more to do). I must admit it's fun swinging a sledgehammer, and I've become quite the dab hand with a crowbar too. Add in the fact that this, for the most part, isn't your regular 2008 drywall that we're ripping out, nope, it's vintage 1965 built-to-last concrete board with a nice layer of plaster. Quite the workout.

For extra giggles it's always fun to see what's behind the walls, or ceilings; a showering of mousepoop is always a refreshing remider that the house has had a few occupants over the years.

Below you can see me smothered in dust, bemasked and protected by thick suede gloves and a v. cool hardhat (cheers M and C).

Destruction

TV is filling my time right now; for the last couple of days I've been on set with The Style Dept, shooting the final episode. Of course the house stuff is still happening - Yesterday David (while chatting with our contractor) went hell for leather on the main floor to start removing drywall and exposing beams. A crowbar, a sledgehammer (and a fair amout of brute strength) and this is the result. 


Pretty nasty

The basement at the house is a bit of a horror show; small dark rooms, icky vinyl floor and spiders, lots of spiders. And well, now things are a bit worse in basement-land... We knew there had been some funny business at some point with the house since the drive-dowwn garage had been bricked-up and the driveway levelled, all to make the basement larger. The funny business was confirmed when a neighbour mentioned that they'd gone to bed one night and woken up to see the work had been done. Funny indeed...

Now, this wasn't a major surprise since our house inspector had mentioned damp issues in this one wall, but still, y'know, in my head at least it's all butterflies and sunshine. We set too ripping off the drywall (well, after a brief trip to Home Depot to pick up the right tools since garden shears weren't quite doing the trick, lol) and you can see below what we discovered. Basically one layer of bricks, 2" x 4"s and some insulation (and a whole lotta damp) is the only thing holding up the driveway. Oh, and they'd kindly left the old wooden garage door frame in place too - Thanks.

Our contractor came over last night and gave us the lowdown - Removing the concrete and asphalt from the front of the house, digging down and removing and replacing the wall with something that's actually structurally sound and, oh, waterproof. Lovely.